Build a Chat app with Appwrite and Nextjs
Updated
•9 min read
Prerequisite
- Node js install on your system.
- Setup of Appwrite see their docs for the setup.
- Basic understanding of React.
Getting Started
- This is the final repo of our app, use this reop as a reference to your project.
- Create a next-js project with
npx create-next-app appwrite-chat-app, open the folder into your favorite code editor and runnpm run devto launch your project. - Now, from the final repo of the project copy all the css from the
/style/global.cssto your project as this blog is not about the css. - Head over to the index.js file inside
/pages/index.js, clean up the file and insert a simple<h1>Hello</h1>code.
Databases and Collections
- Start your appwrite server on localhost:80 on your system and sign in to it, it takes you to the appwrite console.
- Now, create your project by clicking the Create Project and it will take you to your project home dashboard.
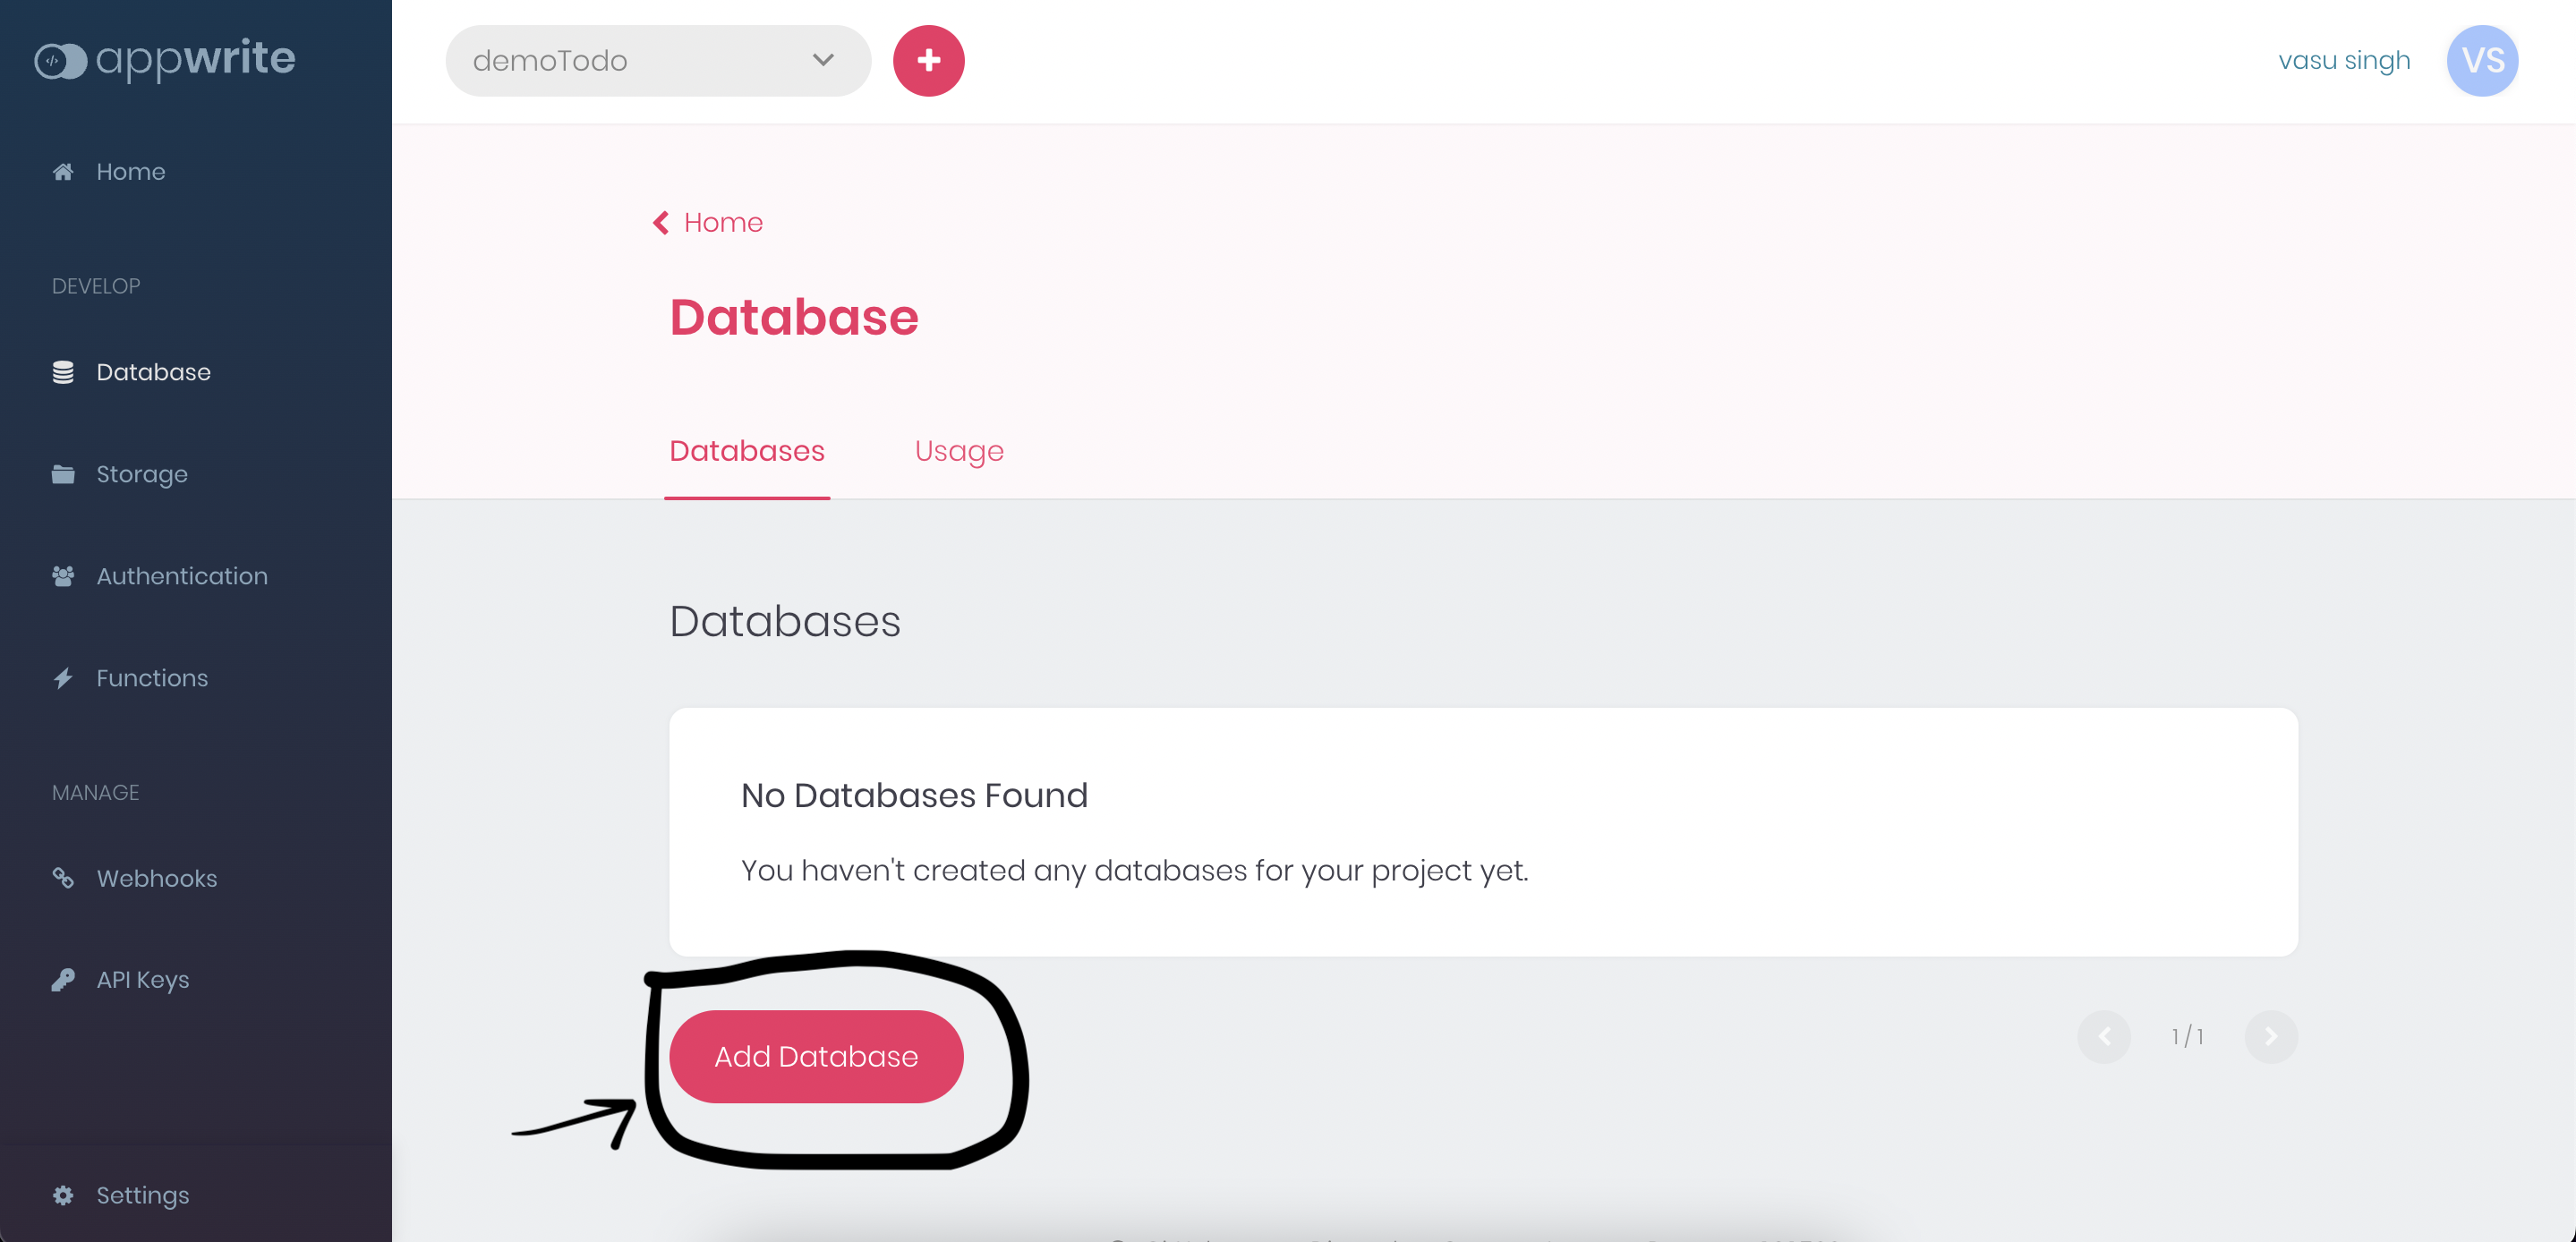
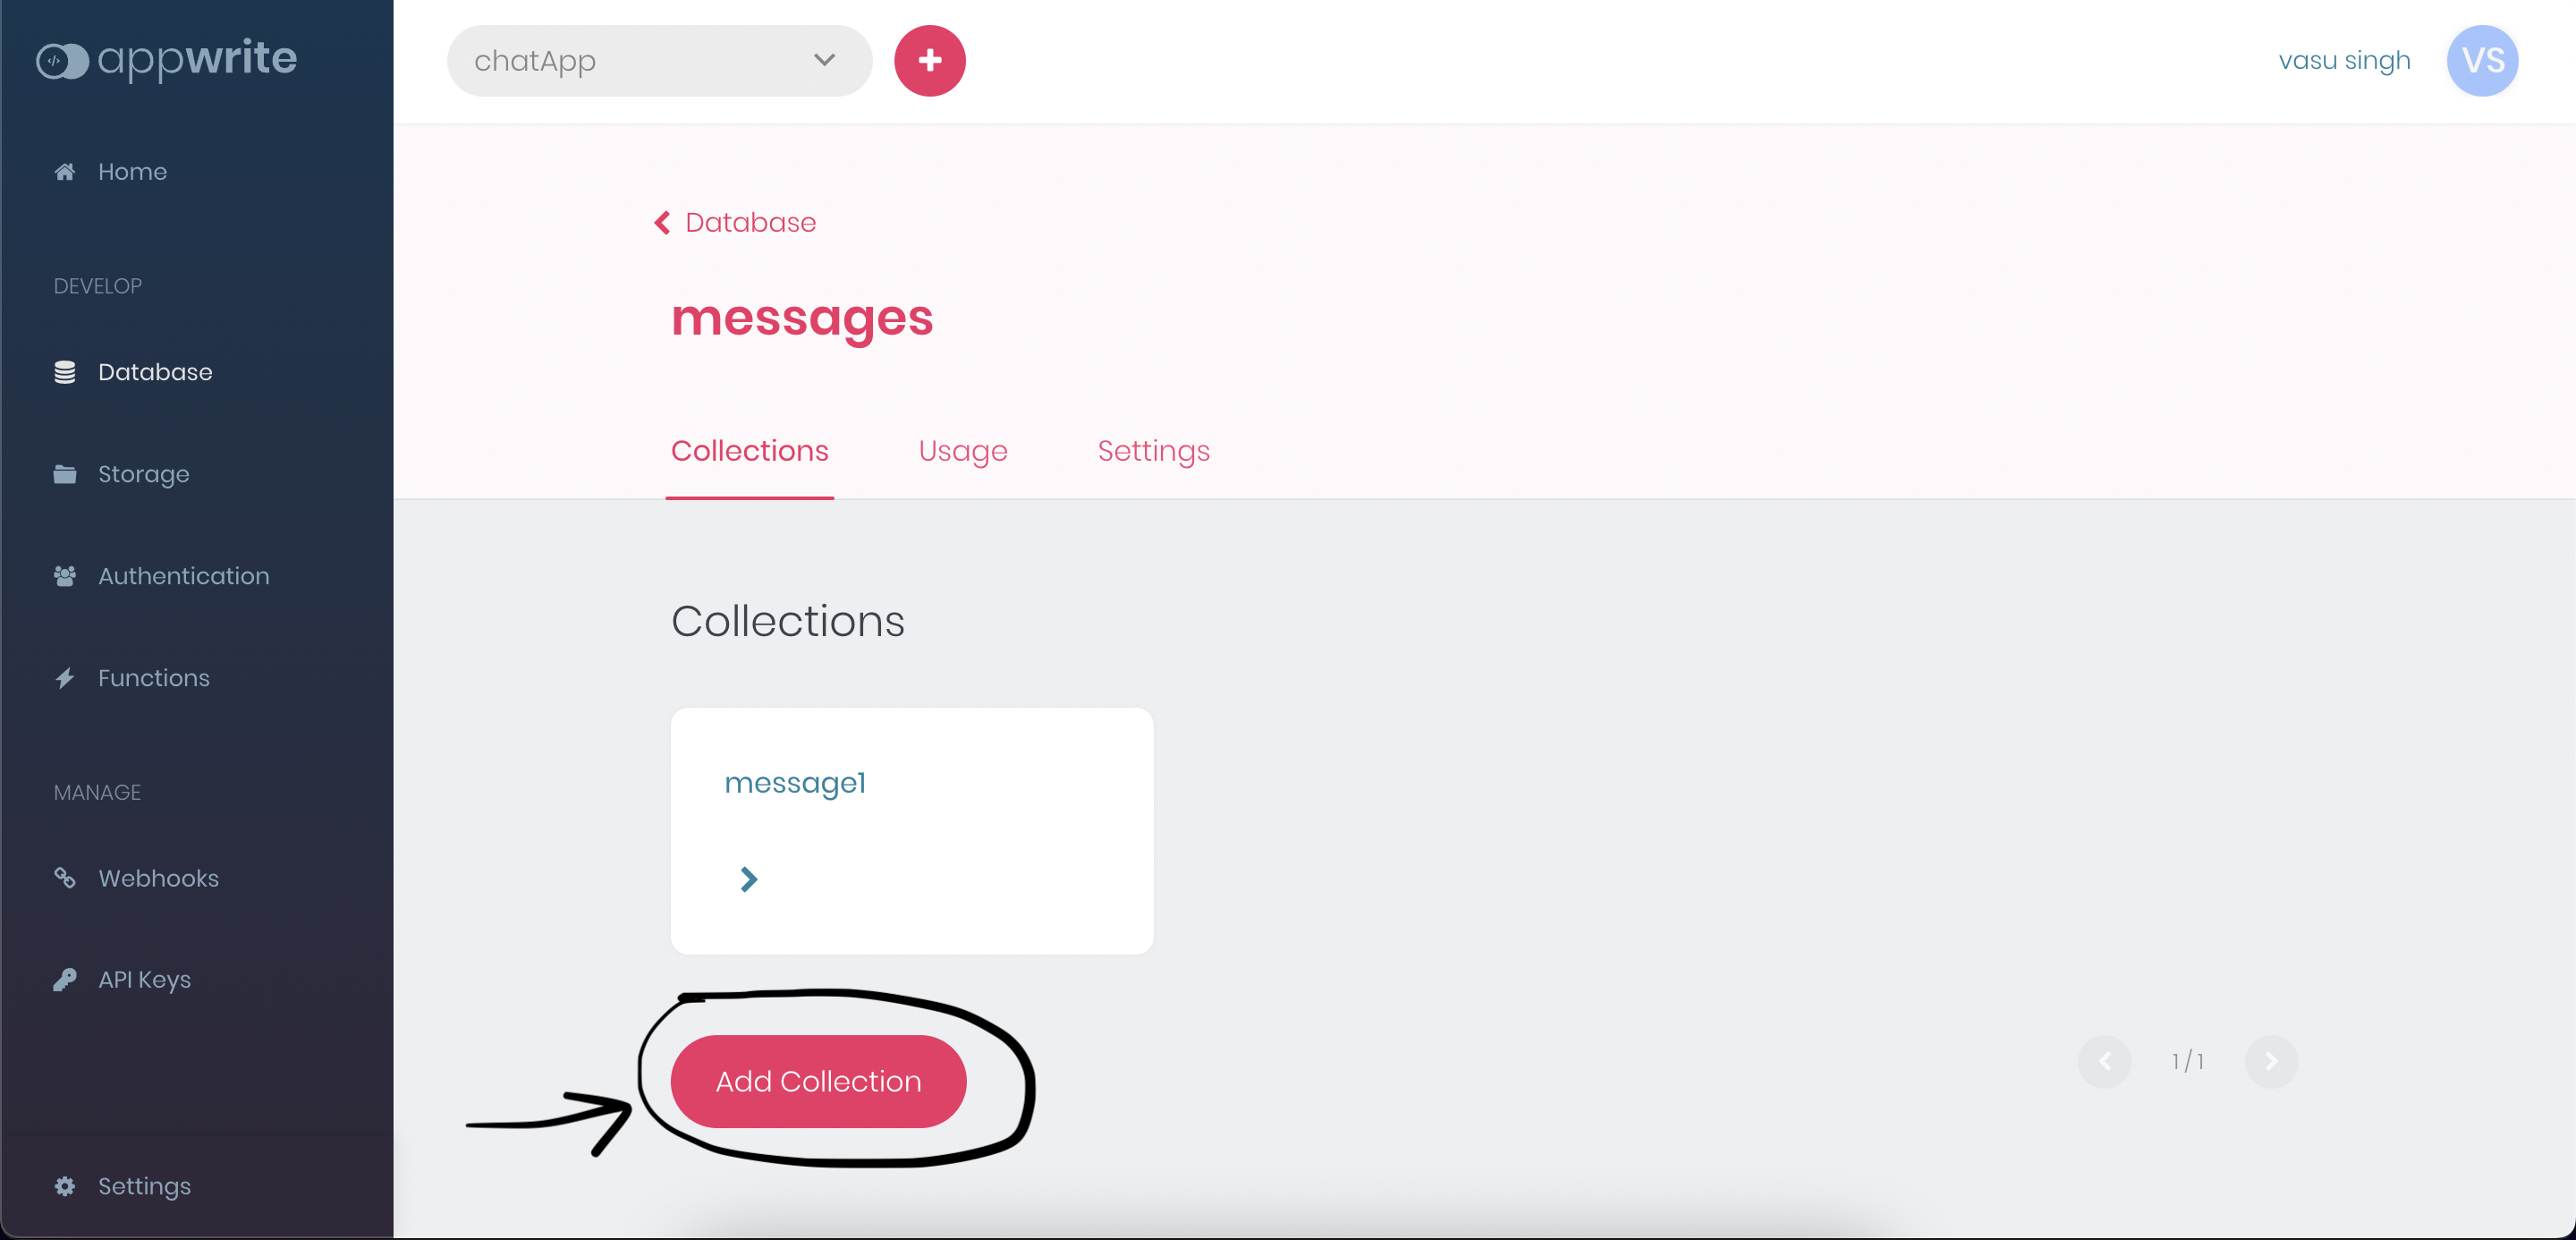
- Head over to the database section and add a database by clicking Add Database, then add a collection to our database.
- Configure the permissions for this collection(Appwrite permission mechanism offers a simple, yet flexible way to manage which users, teams, or roles can access a specific resource in your project, like documents and files.) and add a Role to your collection.
Permission
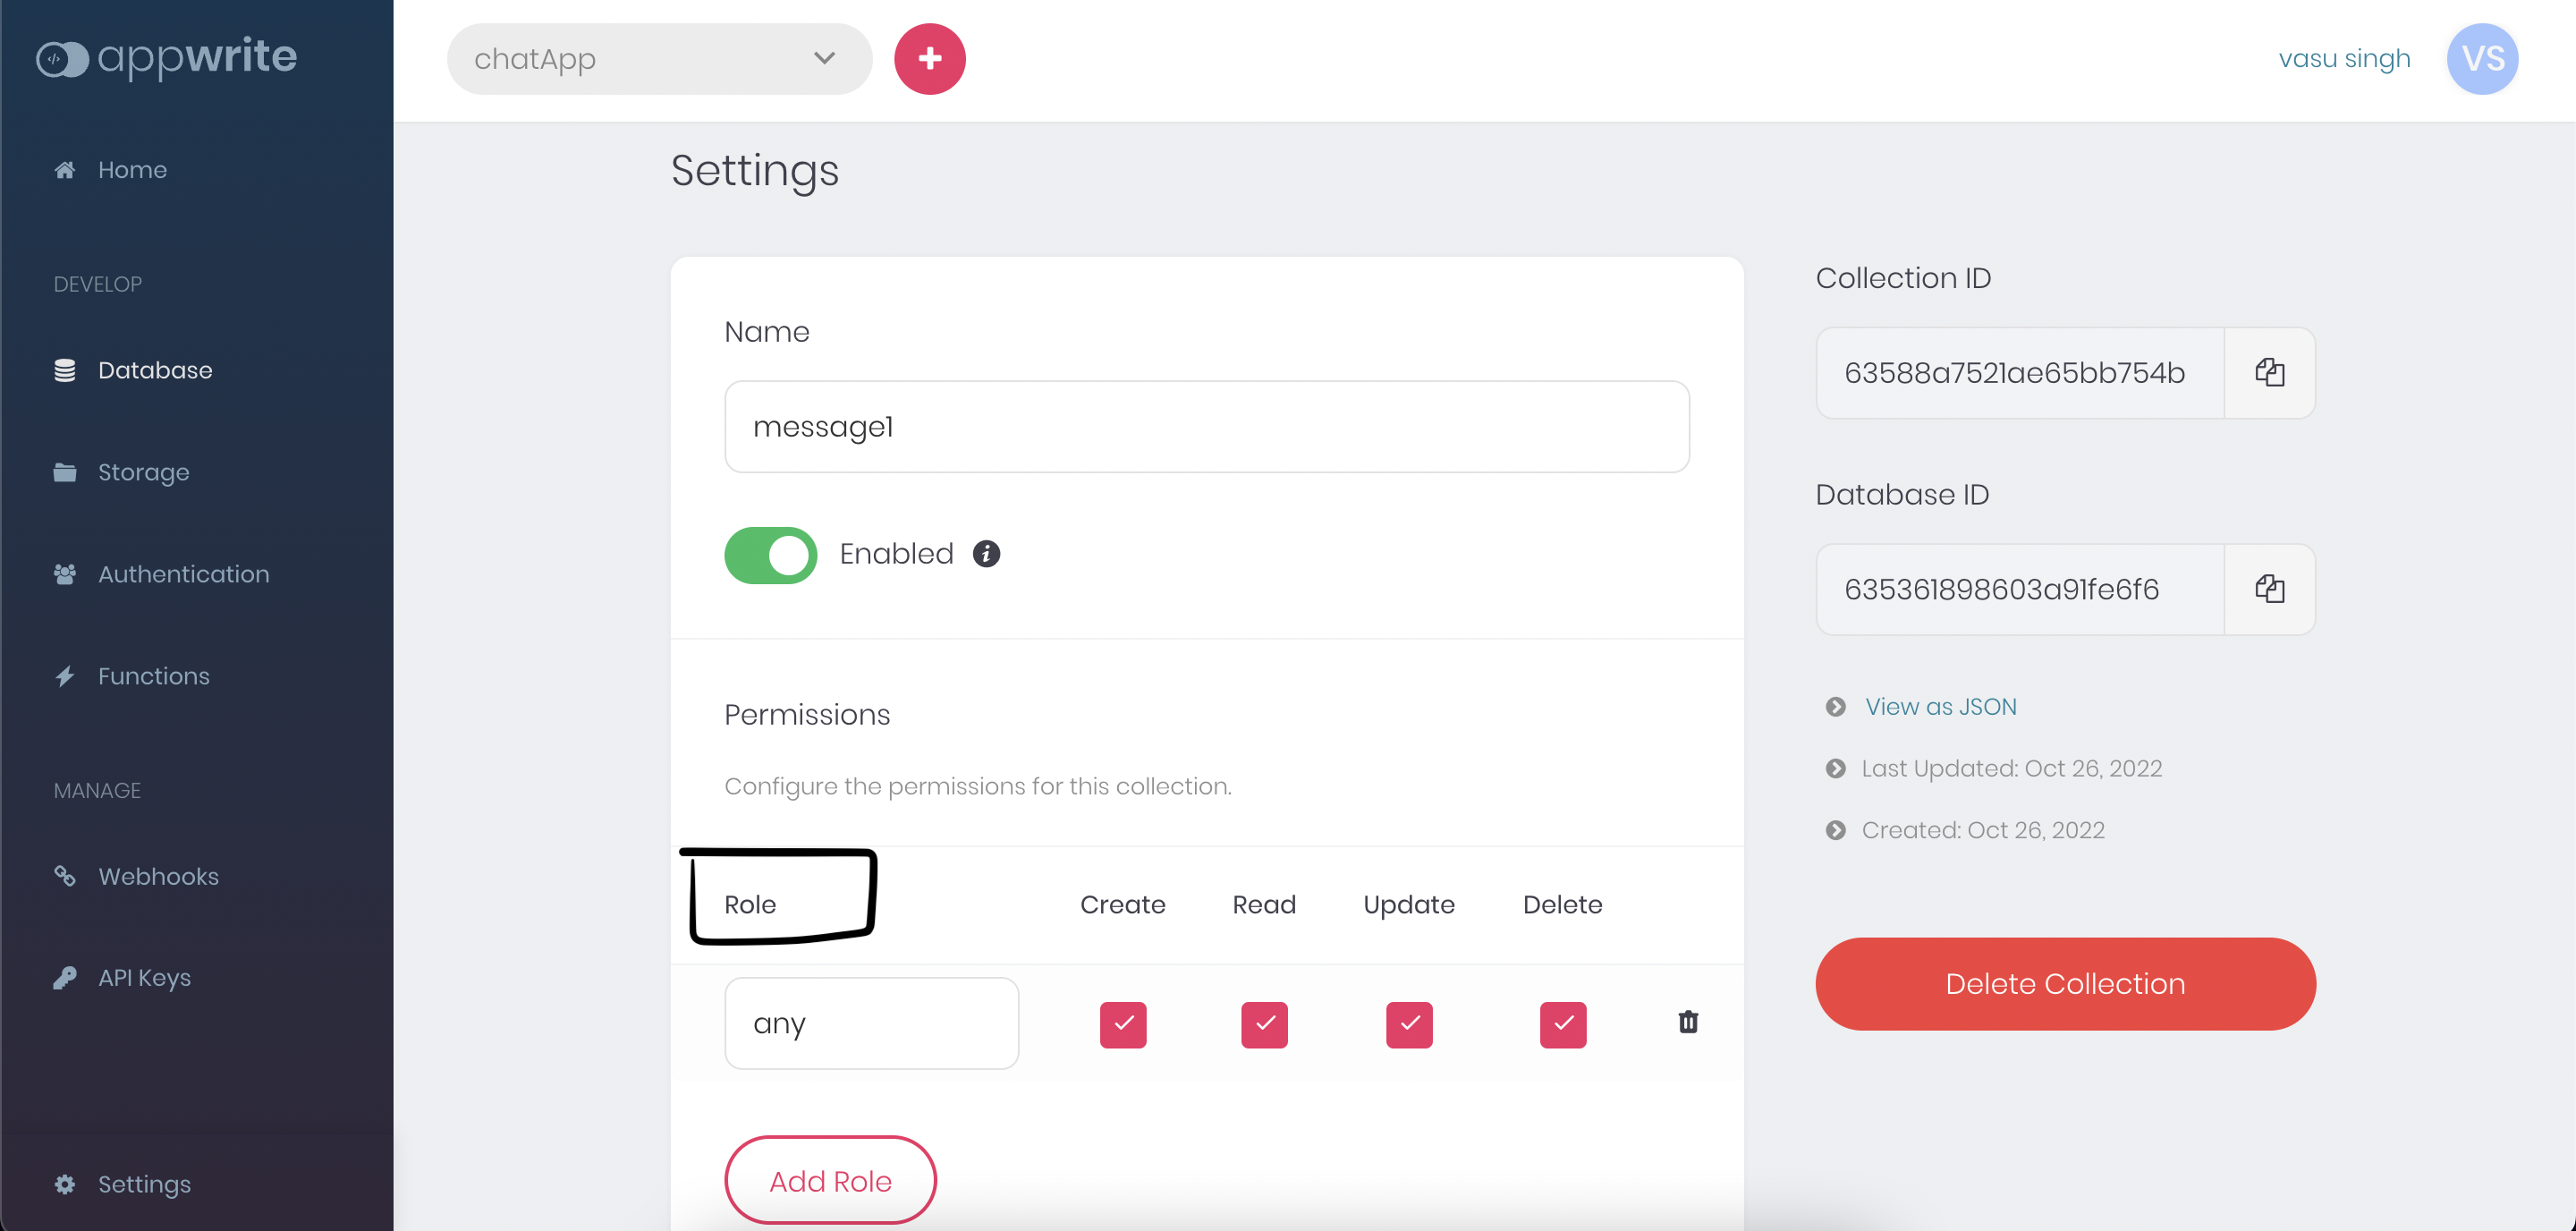
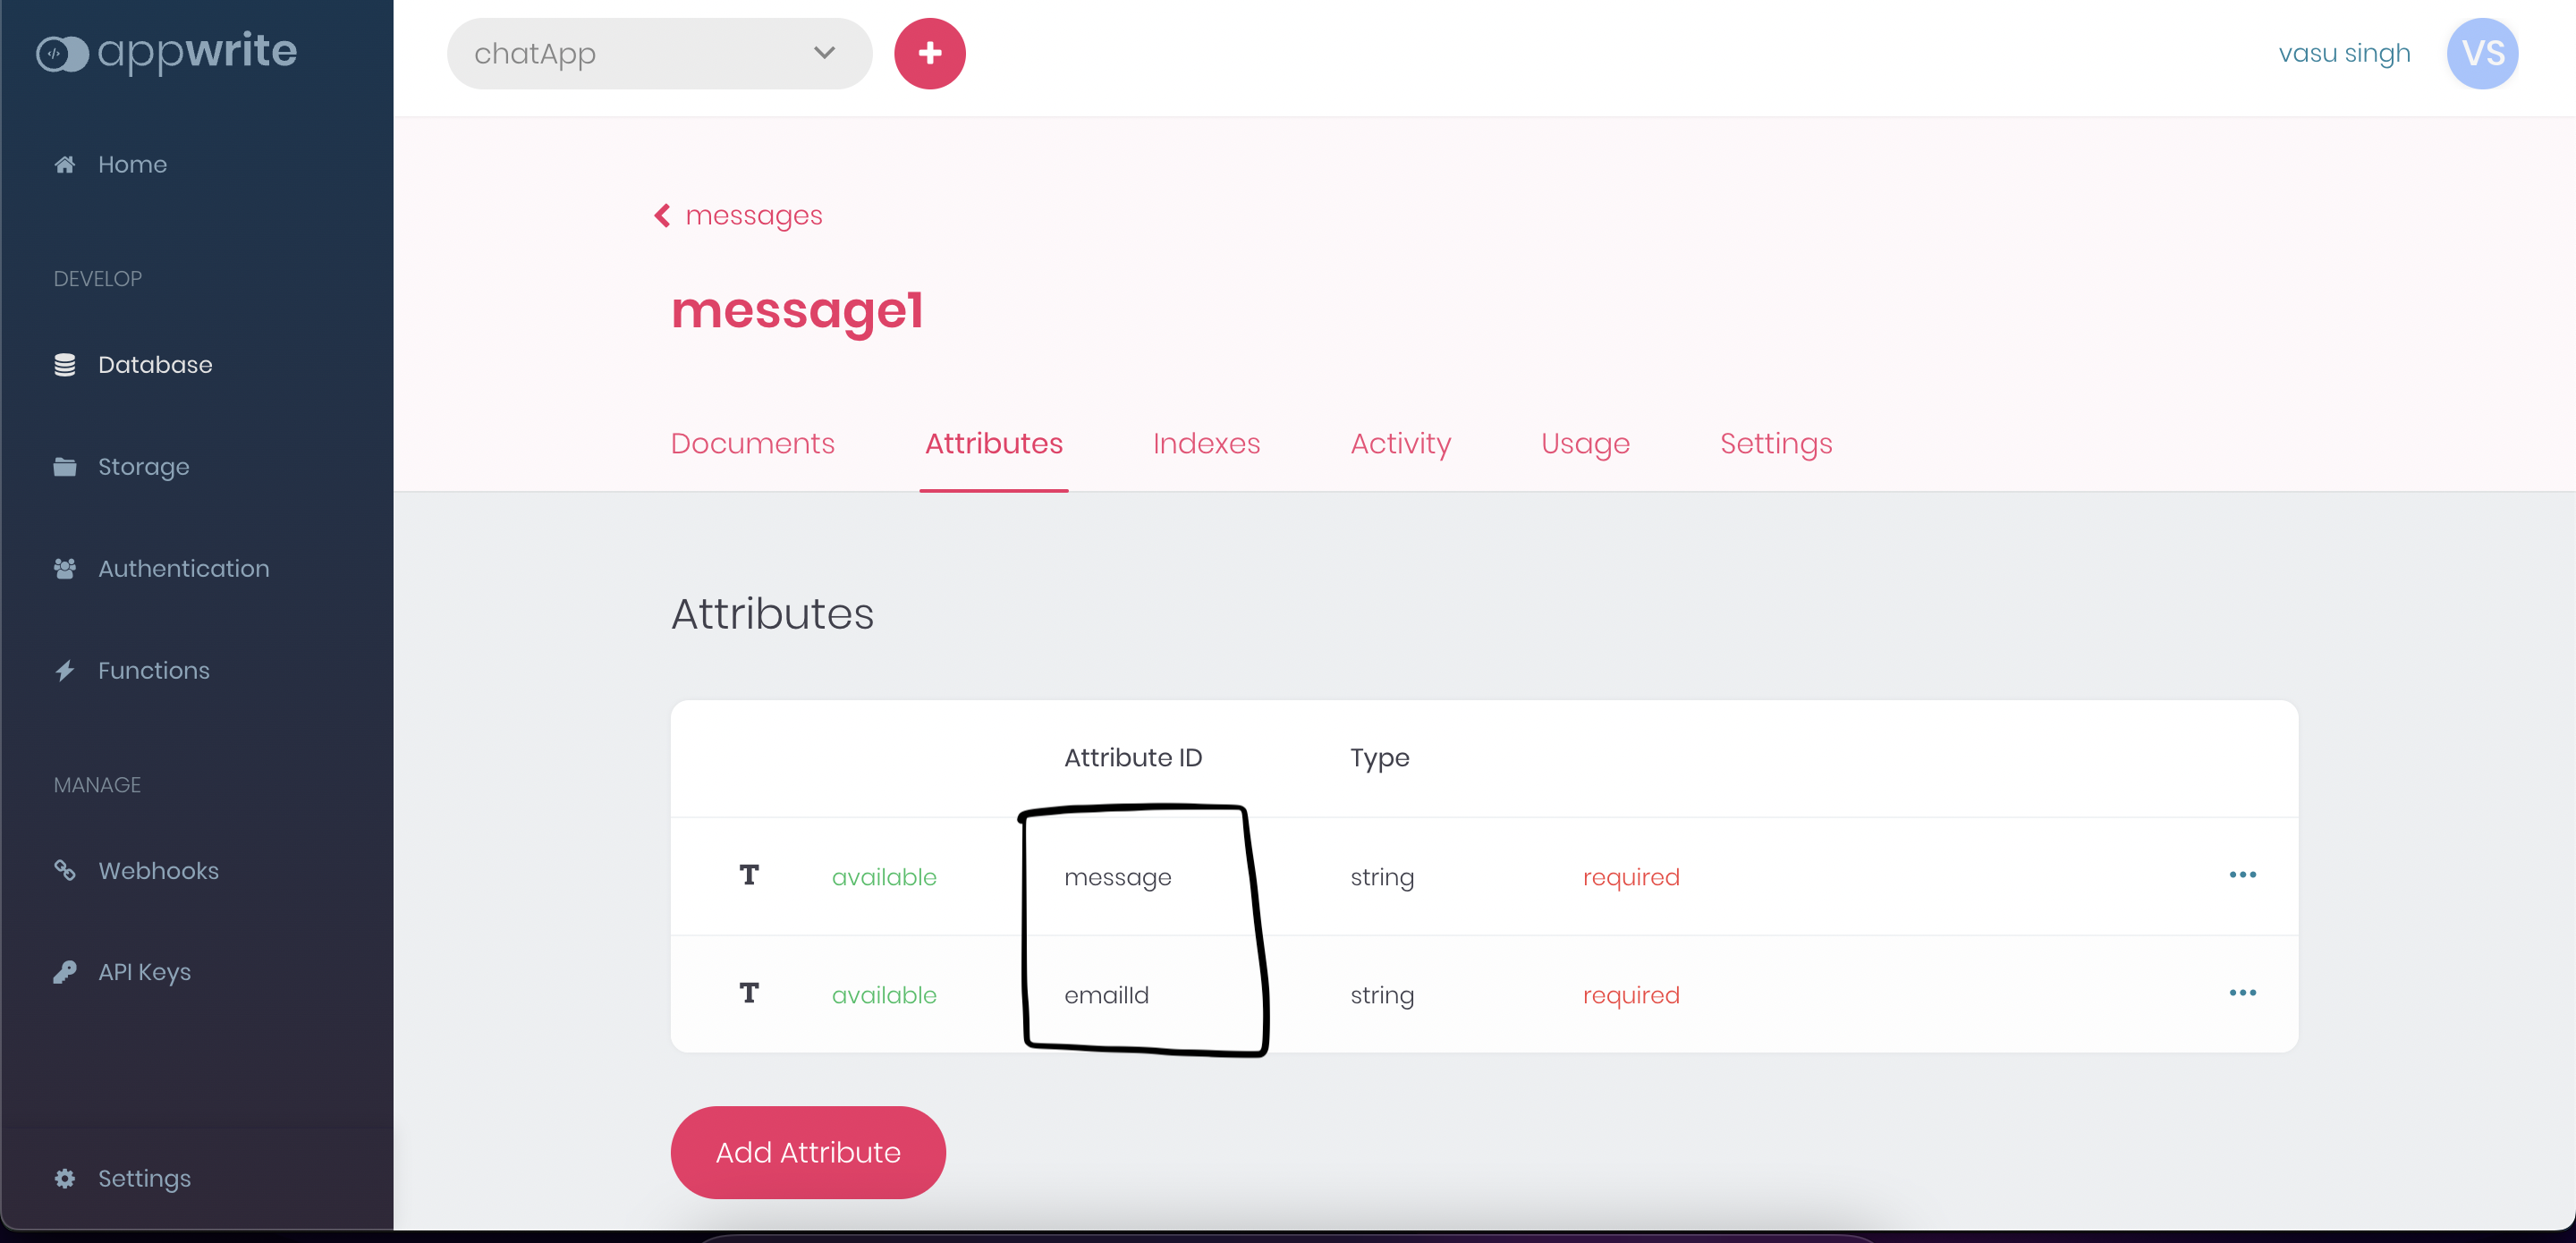
- Now we define the attributes for our collections, our chat message has two string attributes the first one is the message itself and the other one is emailId which refers to the user that sends this particular message.
Database
Collection
Attributes
Connects to the appwrite backend
- Now, inside your project create a folder named appwrite and a file appwrite.js inside the folder.
- The code of our file appwrite.js is very simple and it's something like this,
    import { Client, Account, Databases } from 'appwrite'

    const client = new Client()
    client.setEndpoint('http://localhost/v1').setProject('6351b10aa89690061fa4')

    const account = new Account(client)
    const database = new Databases(client, '635361898603a91fe6f6')

    export{
        client,
        account,
        database
    }
- Let me explain this, first of all, we initialize our project with the help of Client api make sure that you provide your [projected] don't paste the above one.
- The Account api allows you to authenticate and manage a user account and the Database service allows you to create structured collections of documents, that's all for connecting our project to appwrite backend.
Appwrite CLI
- The Appwrite CLI is a command-line application that allows you to interact with the Appwrite server and perform server-side tasks using your terminal.
- Install the CLI using the command
npm install -g appwrite-cli. - Initialize the project using
appwrite init project.
SignUp and Login Functionality
SignUp
- Create two files signup.js and login.js inside the
/pagesfolder. - Head over to the signup.js and paste this code inside your file,
export default function Signup() {
    return (
        <div class='cont'>
            <div class="signup">
                <div class='signup-form'>SignUp</div>
                <div class='fields'>
                    <p>User Name</p>
                    <input
                        required
                        type='text'
                        placeholder='Enter your name'
                    />
                </div>
                <div class='fields'>
                    <p>Email</p>
                    <input
                        required
                        type='email'
                        placeholder='Enter your email'
                    />
                </div>
                <div class='fields'>
                    <p>Password</p>
                    <input
                        required
                        placeholder='Enter your password'
                        type='password'
                    />
                </div>
                <button class='signup-btn'>SignUp</button>
            </div>
        </div>
    )
}
- This is a basic signup form UI and there is no functionality to it now, so don't worry about this.
- You can see that we have 3 input fields in the signup form name, email, and password field, so let's define a user state with the useState() hook, it contains the user signup information that we use to create the user account.
    const [user, setUser] = useState({
        name: "",
        email: "",
        password: ""
    })
- Now, bind the value of each input field with the user state value with the help of the onChange event,
    // set the value of the name input field
    onChange={(e) => {
        setUser({
            ...user,
            name: e.target.value
        })
    }}
- Define a function named signUp that triggers when we submit the form and inside this function, we create the user account with the help of appwrite account api using the
account.create('[USER_ID]', 'email@example.com', 'password')and it returns a promise.
    // signup the user
    const promise = account.create(
        ID.unique(),
        user.email,
        user.password,
        user.name
    )

    promise.then(function (response) {
        console.log(response)   // success
        router.push('/login')   // headover to login if success
    }, function (error) {
        console.log(error)      // faliure
    })
- That's all for our signup functionality below is the complete code of signup.js
/* eslint-disable react-hooks/rules-of-hooks */
import React, { useState } from 'react'
import Link from 'next/link'
import { account } from '../appwrite/appwrite'
import { ID } from 'appwrite'
import { useRouter } from 'next/router';

function signUp() {

    const [user, setUser] = useState({
        name: "",
        email: "",
        password: ""
    })

    const router = useRouter();

    const signUp = (e) => {
        e.preventDefault()

        const promise = account.create(
            ID.unique(),
            user.email,
            user.password,
            user.name
        )

        promise.then(function (response) {
            // console.log(response)
            router.push('/login')
        }, function (error) {
            console.log(error)
        })
    }

    return (
        <div class='cont'>
            <div class="main-cont signup">
                <div class='form-title'>SignUp</div>
                <div class='fields'>
                    <p>User Name</p>
                    <input
                        required
                        type='text'
                        placeholder='Enter your name'
                        onChange={(e) => {
                            setUser({
                              ...user,
                              name: e.target.value
                            })
                          }}
                    />
                </div>
                <div class='fields'>
                    <p>Email</p>
                    <input
                        required
                        type='email'
                        placeholder='Enter your email'
                        onChange={(e) => {
                            setUser({
                              ...user,
                              email: e.target.value
                            })
                          }}
                    />
                </div>
                <div class='fields'>
                    <p>Password</p>
                    <input
                        required
                        placeholder='Enter your password'
                        type='password'
                        onChange={(e) => {
                            setUser({
                              ...user,
                              password: e.target.value
                            })
                          }}
                    />
                </div>
                <div class='footer'>
                    <button class='submit-btn' onClick={signUp}>SignUp</button>
                    <Link href='/login' class='links'>Have an Account!</Link>
                </div>
            </div>
        </div>
    )
}

export default signUp
Login
- Implementing the login functionality is same as the signup one, we can check that an user exist or not with the help of
account.createEmailSession([user_email], [user_password]. - Here is the complete code of the login.js file
/* eslint-disable react-hooks/rules-of-hooks */
import React, { useState } from 'react'
import Link from 'next/link'
import { account } from '../appwrite/appwrite'
import { useRouter } from 'next/router';

function login() {

    const [user, setUser] = useState({
        email: "",
        password: ""
    })

    const router = useRouter();

    const login = (e) => {
        e.preventDefault()

        const promise = account.createEmailSession(user.email, user.password);

        promise.then(function (response) {
            // console.log(response)
            router.push('/room')
        }, function (error) {
            console.log(error)
        })
    }

    return (
        <div class='cont'>
            <div class="main-cont login">
                <div class='form-title'>Login</div>
                <div class='fields'>
                    <p>Email</p>
                    <input
                        type='email'
                        placeholder='Enter your email'
                        required
                        onChange={(e) => {
                            setUser({
                              ...user,
                              email: e.target.value
                            })
                          }}
                    />
                </div>
                <div class='fields'>
                    <p>Password</p>
                    <input
                        placeholder='Enter your password'
                        required
                        type='password'
                        onChange={(e) => {
                            setUser({
                              ...user,
                              password: e.target.value
                            })
                          }}
                    />
                </div>
                <div class='footer'>
                    <button class='submit-btn' onClick={login}>Login</button>
                    <Link class='links' href='/signup'>Create an Account?</Link>
                </div>
            </div>
        </div>
    )
}

export default login
- You can test these functionalities by creating your own account in the project, to create a user directly from your terminal use the
appwrite users create --userId "unique()" --email hello@appwrite.io --password very_strong_passwordcli command. - To get a list of all your project users, you can use the
appwrite users listcommand. - Check the project users in the console,
Users

Sending and Receiving the messages
- Create a file named room.js inside the
/pagesfolder. - Define an input field for typing our message and a send button
    <div className='form'>
        <input className='room-inp' placeholder="Send Message" />
        <button>Send</button>
    </div>
- Define a state named message
const [message, setMessage] = useState("")and bind it to the input field with the onChange event<input value={message} className='room-inp' onChange={(e) => setMessage(e.target.value)} placeholder="Send Message" />, we submit this message value to our database. - Create a function named sendMessage() that creates a new document to our database and from there we fetch all the documents to render them as our messages.
- We, can create a document simply by command
database.createDocument([Database_id]', '[Collection_id]', [Document_id], { })
    const promise = database.createDocument('635361898603a91fe6f6', '63588a7521ae65bb754b',
                ID.unique(),
                {
                    message: message,
                    emailId: user.email                   // user that sends this message
                })

        promise.then(function (response) {
            // console.log(response)  success
        }, function (error) {
            console.log(error)        // failure
        })
- To show the messages we have to fetch all the messages from our database, we can list all the documents of a collection with the
database.listDocuments('[Database_id]', '[Collection_id]');. - Create a function named getCollection() to list all the documents.
- We store all of our the documents in the state named allMessages
const [allMessages, setAllMessages] = useState([]).
    const getCollections = () => {
        const promise1 = database.listDocuments('635361898603a91fe6f6''63588a7521ae65bb754b');

        promise1.then(function (response) {
            // console.log(response)
            setAllMessages(response.documents)
        }, function (error) {
            console.log(error)
        })
    }
- Now, to render all the documents as messages we map over the allMessages array.
- Create a folder named components inside your project folder and a file named chat.js inside it.
- Complete code of the room.js file
/* eslint-disable react-hooks/rules-of-hooks */
import React, { useEffect, useRef, useState } from 'react'
import { database, account } from '../appwrite/appwrite'
import { ID } from 'appwrite'
import Chat from '../components/Chat';
import { useRouter } from 'next/router';

function room() {

    const [user, setUser] = useState()
    const [message, setMessage] = useState("")
    const [allMessages, setAllMessages] = useState([])

    const router = useRouter()
    const dummy = useRef()

    // fetch all the documents when the webpage load
    useEffect(() => {
        const promise1 = database.listDocuments('635361898603a91fe6f6', '63588a7521ae65bb754b');

        promise1.then(function (response) {
            // console.log(response)
            setAllMessages(response.documents)
        }, function (error) {
            console.log(error)
        })

        const getUser = account.get()
        getUser.then(function (response) {
            // console.log(response)
            setUser(response)
        }, function (error) {
            console.log(error)
        })
    }, [])

    const sendMessage = (e) => {
        e.preventDefault()

        const promise = database.createDocument('635361898603a91fe6f6', '63588a7521ae65bb754b',
            ID.unique(),
            {
                message: message,
                emailId: user.email
            })

        promise.then(function (response) {
            // console.log(response)
        }, function (error) {
            console.log(error)
        })

        const getCollections = () => {
            const promise1 = database.listDocuments('635361898603a91fe6f6', '63588a7521ae65bb754b');

            promise1.then(function (response) {
                // console.log(response)
                setAllMessages(response.documents)
            }, function (error) {
                console.log(error)
            })
        }

        getCollections()
        getCollections()
        dummy.current.scrollIntoView({ behavior: 'smooth' })
        setMessage("")
    }

    // log-out the current user
    const logOut = (e) => {
        e.preventDefault()
        account.deleteSession('current')
        router.push('/signup')
    }

    useEffect(() => {
        dummy.current.scrollIntoView({ behavior: 'smooth' })
    })

    return (
        <div className='room-cont'>
            <div className='sidebar'>
                <p className='title'>NextWrite💬</p>
                <button className='log' onClick={logOut}>LogOut</button>
            </div>
            <div className='room'>
                <div className='chat'>
                    {allMessages.map((message) => {
                        return <Chat key={message.$id} msg={message} />
                    })}
                    <div className='ref' ref={dummy}></div>
                </div>
                <div className='form'>
                    <input value={message} className='room-inp' onChange={(e) => setMessage(e.target.value)} placeholder="Send Message" />
                    <button onClick={sendMessage}>Send</button>
                </div>
            </div>
        </div>
    )
}

export default room
    <div className='chat'>
        {allMessages.map((message) => {
            return <Chat key={message.$id} msg={message} />
        })}
        <div className='ref' ref={dummy}></div>
    </div>
- Head over to the
/components/chat.jsto render our messages simply with the code
import React, { useEffect, useState } from 'react'
import { account, avatar } from '../appwrite/appwrite'

function Chat({ key, msg }) {

    const [user, setUser] = useState({})
    const [imageType, setImageType] = useState()

    // identify whether the message string is an image-url or not
    function isImage(url) {
        return /\.(jpg|jpeg|png|webp|avif|gif|svg)$/.test(url);
    }

    useEffect(() => {
        const promise = account.get()
        promise.then(function (response) {
            // console.log(response)
            setUser(response)
        }, function (error) {
            console.log(error)
        })

        const type = isImage(msg.message)
        setImageType(type)
    }, [])

    const chatType = user.email === msg.emailId ? 'sent' : 'received'
    const imageClass = user.email === msg.emailId ? 'sent-img-up' : 'received-img-up'

    return (

        <div className='chatAll'>
            {!imageType && <span className={chatType} key={msg.key}>
                <span className='user-name'>{user.name}</span>
                <span>{msg.message}</span>
            </span>}
            {imageType && <img className={imageClass} src={msg.message} alt='image' />}
        </div>
    )
}

export default Chat
- Here, we have a state imageType which is set to true if the current message is an image-url otherwise false if it's a normal string.
- The user state is used to identify whether we send or receive the current message, we can get the currently logged account details simply with
account.get()
